BMW Rheingold ISTA-D ISTA-P free download, user manual download and installations/instructions provided here for free.
What is BMW Rheingold ISTA ?
BMW Rheingold ISTA-D User Manual Download
BMW Rheingold ISTA 4.03.21 Free download Win7/Win8/Win10
How to install and setup BMW Rheingold ISTA?
Diagnostic with BMW ISTA-D
Programming with BMW ISTA-P
What is BMW Rheingold ISTA ?
ISTA is a workshop system that contains BMW AG Data and Information. ISTA stands for Integrated Service Technical Application. Way back when, during the initial development of this tool, BMW used DIS (Diagnostics Information System), and as the programs evolved and due to the nature of the file naming conventions utilized by BMW, the workshop system became known as Rheingold in the enthusiast world. Rheingold in actuality is the folder that contains the main application and data. Rheingold became ISTA-D (D stands for Diagnostics) and BMW’s programming application (not discussed in this document) used the same nomenclature, ISTA except with a P (for programming) or ISTA-P.
BMW Rheingold 4.06.31 ISTA Functions List:
1. Module (ECU) errors reading and clearing
2. Gearbox (transmission) and engine adaptations erasing
3. Fuel injectors control, correction amount real time viewing, injector registering
4. Engine mountings testing
5. Mass air flow (MAF) testing and registering. Whole air system testing
6. EGR system control and testing
7.Turbocharger and related components control and testing
8. Diesel particulate filter regeneration (DPF)
9. Battery replacement
10. Oil change and service interval reset
11. Wiring diagrams, live data, repair instructions, technical documents etc
12. Programming, vehicle retrofit, mirror coding, FSC codes adding or updating etc
….
And many more other functions
System Requirements:
Windows 7 (32-bit or 64-bit)
Windows 8 or 8.1 (32-bit or 64-bit)
Windows 10 (32-bit or 64-bit)
Minimum system configuration is now hard coded into the program, although the standalone versions have this check removed.
2.2Ghz CPU – 2 core minimum, core i5 or i7 recommended 4GB RAM, 8GB recommended Minimum 20+GB HDD free space for ISTA+ Diagnostics with ONE language, and minimum 100GB for Programming Data.
This version has hardware check removed, however, future versions MAY not have this feature. A faster system is required. This version discusses included English Databases only. If more required, add to SQLiteDBs folder, which will need more space.
Interfaces and other requirements
E-S ERIES :
* Interface = K+DCAN Cable or ICOM A1/ICOM A2/ICOM Next
* EDIABAS = Low Level ECU Communication Software Server used by ISTA+
F/G/I/M INI /RR-S ERIES :
* Interface = ENET Cable or ICOM
ICOM:
* ICOM A: main interface
* ICOM B: adapter for programming multimedia in E series
* ICOM C: adapter for old BMW with round 20 pin diagnostic plug
* ICOM D: adapter for motorcycles
BMW Rheingold ISTA User Manual PDF Download:
User manual 1:
1 Introduction
Explanation of the symbols used
Important security instructions
Chapter contents
Integrated Service Technical Application (ISTA)
ISTA operating modes
Data exchange with other systems
Distinguishing different makes
General operation of the ISTA workshop system
2 Overview and short introduction
Starting the ISTA Client
Checking the operations list
Selecting a vehicle
Selecting a diagnostic connection to the vehicle
Creating an operation
Finding out about operation details
Perform vehicle test
Display fault memory
Editing a test plan
Running a procedure
Terminating an operation
3. Menu structure
Start mask
Identification
Vehicle test.
Activities
Service plan
Operations
4. Appendix
Scope of functions for operator devices
Abbreviations
Glossary
Fault messages and fault rectification
Index
BMW Rheingold ISTA User manual 1 download
User manual 2:
1. BMW Rheigold ISTA Introduction
2. System Requirements
3. Interfaces and other erqurements
4. How To Install BMW Rheingold ISTA Software
5. Programming note
6.Interface configuration and verification with ISTA+
7. Diagnostics with ISTA+
BMW Rheingold ISTA User manual 2 download
BMW Rheingold ISTA 4.03.21 Free download:
BMW Rheingold ISTA 4.07.22
https://mega.nz/#F!bJJlHJxS!IutlwTO55wUfk_n_rl3k0Q
BMW Rheingold ISTA+ 4.03.21 Standalone +SQLiteDBs +language package:
https://mega.nz/#F!4Msz2RgL!jvZdlqN3SF75Z5rIRnWnYg
BMW_ISPI_ISTA-APP_4.03.21.18572
https://mega.nz/#!YxVAwAaL!vglnpcrLzUR5GZnejxOEoes4-HC13f3FUBlOqc1C-Do
Free download BMW ISTA 4.03.21 Delta Database:
(EN-DE-Global-Meta)
BMW_ISPI_ISTA-DATA_DELTA_4.03.21.istapackage 121MB
https://mega.nz/#!nJ8XyZZB!iZ7tn_6-geNMICmudHBTjeAJ4yuVhbj3B8cqPRXFWH0
BMW_ISPI_ISTA-DATA_DELTA_en-GB_4.03.21.istapackage 378kb
https://mega.nz/#!3ZcVzDxB!pg97aDWK3jY6yCDTW3n3Se1KXK7Ovnz3i1ZkRbHsFnA
BMW_ISPI_ISTA-DATA_DELTA_de-DE_4.03.21.istapackage
https://mega.nz/#!74FHFACC!vXaMcWJjma8E01YFaf0YBuObIeF9s2WoccNSWZe2PSw
BMW_ISPI_ISTA-META_4.03.22.xml 17kb
https://mega.nz/#!6NUS0bQI!aCxykkVKs3F6WxzMWrt6Cnezy7vwHmLP-H7PLhk998s
BMW Rheingold ISTA Installation Guide:
BMW ISTA installation method may differ from source and version. This method is only for reference.But different version installations are similar,if your version is another this document is also helpful.
Porcedures of How to install BMW Rheigold ISTA:
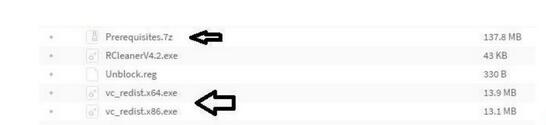
Step 1:Download and run unblock.reg BEFORE downloading anything else. Then REBOOT the computer, this is a critical step.

Step 2:Install everything in Prerequisites folder, only if you don’t have a previous Rheingold installation. For 64-bit Windows, install both vcredist x32 & x64 from Microsoft, if not already installed.
Step3:Install the following – you can get both from Microsoft.
* Visual C++ Redistributable Packages for Visual Studio 2013
* .NET Framework 4.6
Step4: Download Rheingold.7z using MegaSync or JDownloader. Once downloaded, check whether“Rheingold.7z” is blocked. If it is, unblock it. Right click on the file, go to Properties and if files are blocked, then you will see the unblock button as in the picture below:
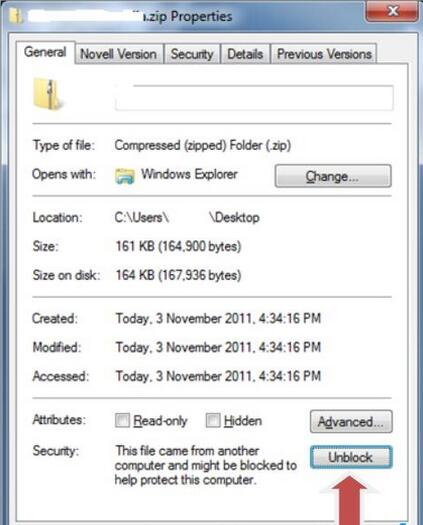
Step 5: Extract Rheingold.7z using 7zip ONLY. You may have to give admin privileges for extracting. Location doesn’t matter, but preferred location is C:\. If extracting to this location, you will need admin privileges for 7zip before extracting the file. To avoid future issues with admin rights etc. you can also extract this file to the root of a secondary drive, for e.g. D:\
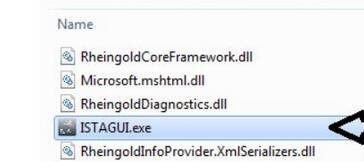
Step 6: Assuming you extracted the file to the location suggested above, create desktop shortcut from“C:\Rheingold\TesterGUI\bin\Release\ISTAGUI.exe”. If not, create the shortcut from the location you extracted the files to.
Step 7: Run the following registry fixes, depending from your OS:
* From the Mega site, download and run the following two registry files:
Ista-prog-x64.reg
Ista-prog-x86.reg
* Also run the following registry fixes from the C:\Rheingold folder (scroll all the way to the bottom to see these files):

Step 8: Run ISTAGUI shortcut from your desktop as administrator.
Step 9: When prompted for license, copy the license key from the “rheingold-license.txt” located in “C: \Rheingold”

Step 10:If/When prompted for dealer ID, enter “1” and ignore following warnings. ISTA+ will close.
Step 11:Run again ISTAGUI shortcut from your desktop as administrator and verify the databases in Settings >Version tab in ISTA/D If you encounter start/running issues, delete the “Rheingold” folder from “C:\”,run “RCleanerV4.4.exe” as administrator and start again from step 5.
PROGRAMMING NOTE:
ISTA+ PROGRAMMING is only for F, G and I Series, Mini and Rolls Royce cars
ISTA-P will contain all chassis data until around August 2017, then BMW plans to phase out all BN2020 vehicle data in ISTA-P. So ISTA-P will be to program E-series only and ISTA+ will program everything else. Programming is now enabled in the Registry, so no changes to ISTAGUI.exe.config file are required.
ISTA+ PROGRAMMING WITH ENET WILL NOT WORK. YOU NEED ICOM INTERFACE.
INTERFACE CONFIGURATION AND VERIFICATION WITH ISTA+
The following information is freely available on the internet, however, has been consolidated here to help the DIYer in interface configuration (Rheingold, ISTA-D and ISTA+ all are all simultaneous and are used interchangeably. For the purposes of this document, we will only use 3 interfaces, K+DCAN, ENET and ICOM. Additional configuration of these interfaces is not discussed here. Refer to other publicly available information on the internet or specific forums.
USING BMW RHEINGOLD ISTA WITH BMW ICOM
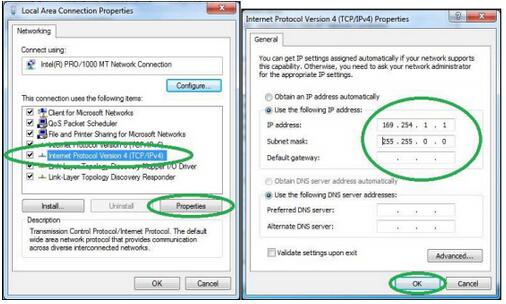
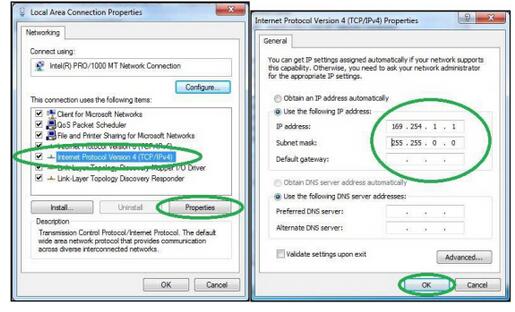
1. Open used for connection network adapter properties, then “Internet Protocol Version 4 (TCP/IPv4)” properties, then enter 169.254.1.1 for “IP address” and 255.255.0.0 for “Subnetmask”.
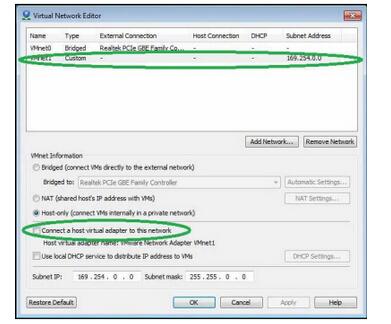
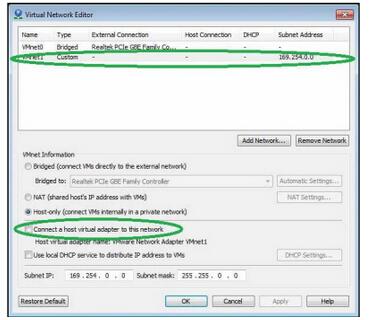
2. If VMware is installed, open Virtual Network Editor and disconnect from the host any adapters with Subnet Address 169.254.0.0.
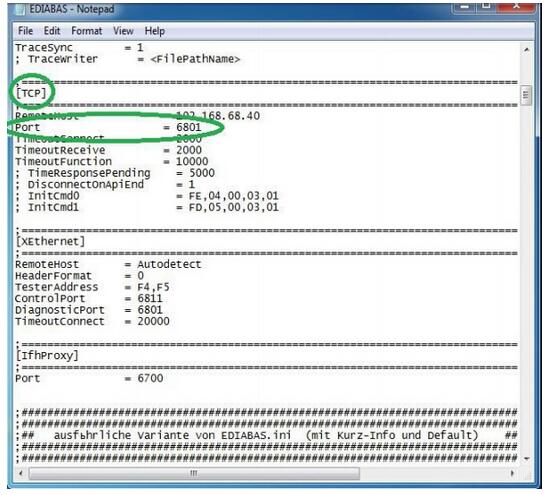
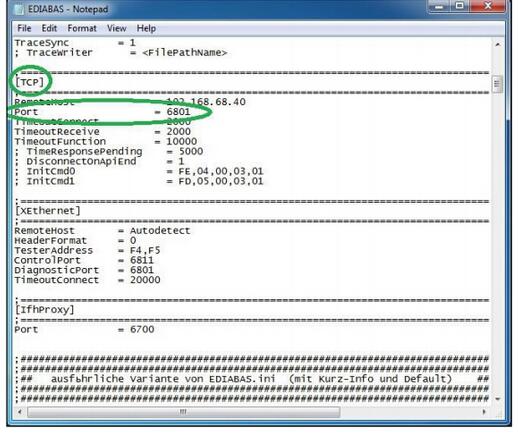
3. Open C:\EDIABAS\BIN\EDIABAS.INI with Notepad and check for “Port = 6801” in TCP settings.
4. Connect car with ICOM to PC.
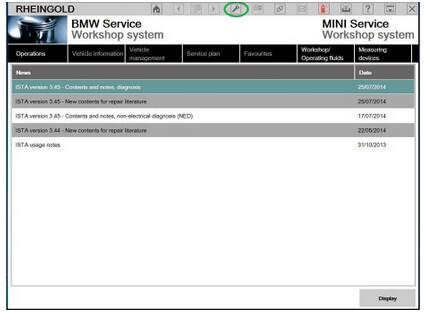
5. Now run BMW Rheingold ISTA using shortcut in start menu and wait until it boots, then press settings button.
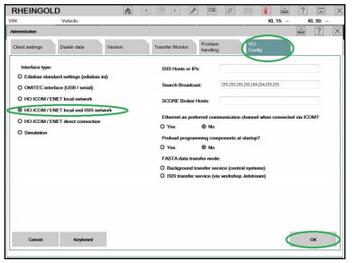
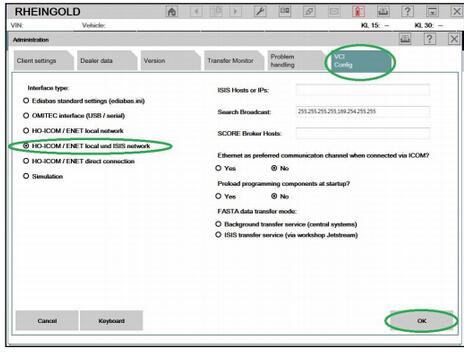
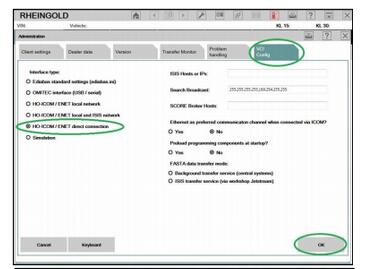
6. Select “VCI Config” tab and “HO-ICOM/ENET local and ISIS network”, then “OK”.
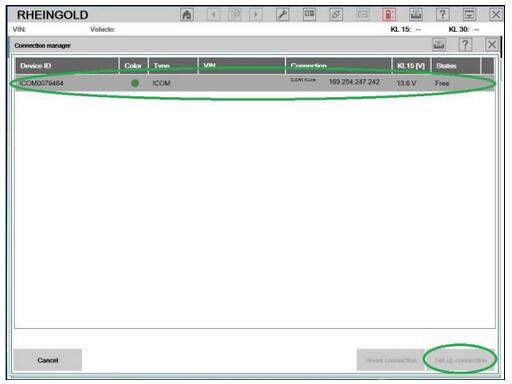
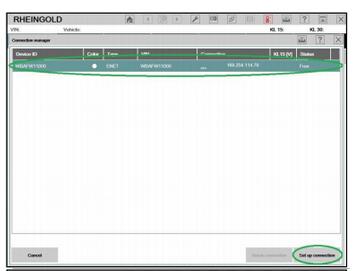
7. Go “Operations”, then “Read Out Vehicle Data” and “Complete Identification”.
8. Select your ICOM from the list and press “Set up connection”button.
USING ISTA WITH INPA K+D-CAN CABLE (Example using Com Port 9)
1. Plug your K+D-CAN cable and install drivers. For FTDI based cables use latest drivers.
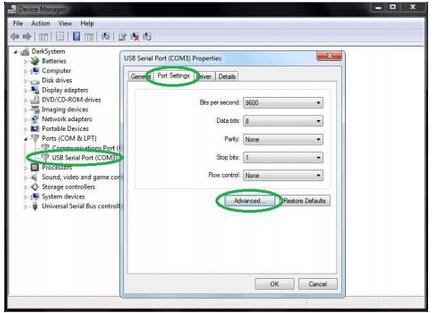
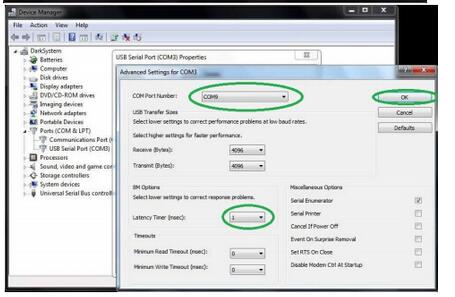
2. Open “Device Manager”, then USB Serial Port properties, go to “Port Settings” tab and click “Advanced…”. Change port number to “COM9” and latency timer to “1”. Confirm configuration via “OK” button.
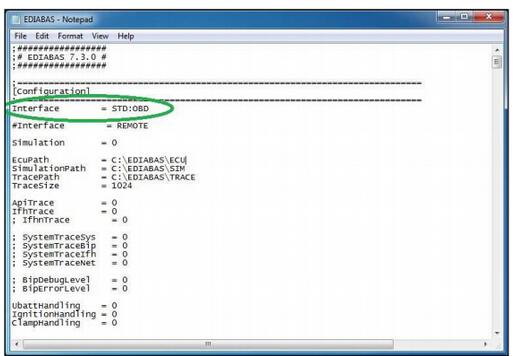
3. Open C:\EDIABAS\BIN\EDIABAS.INI with Notepad and check for “Interface = STD:OBD”. In TCP settings set “Port = 6801”.
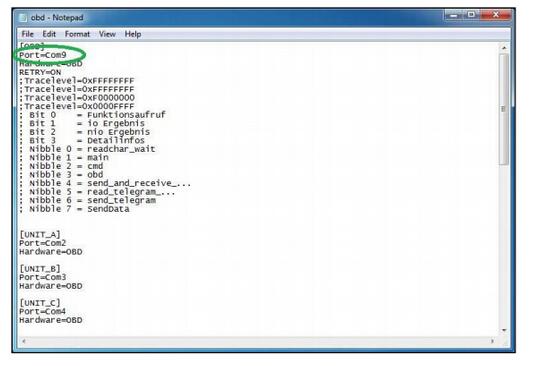
4. Open C:\EDIABAS\BIN\OBD.INI with Notepad and check for“Port=Com9”
5. Connect car with K+D-CAN cable to PC.
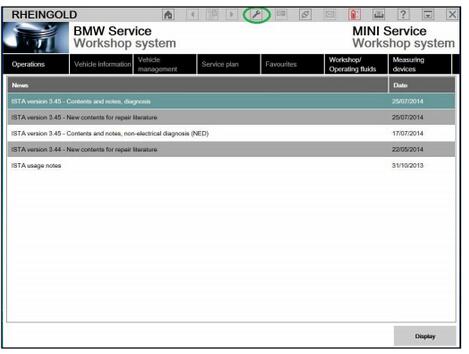
6. Now run BMW Rheingold ISTA using shortcut in start menu and wait until it boots, then press settings button.
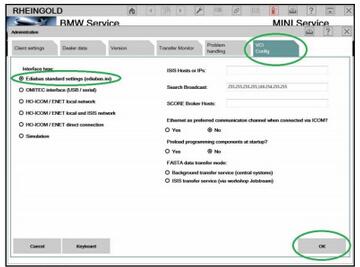
7. Select “VCI Config” tab and “Ediabas standard settings (ediabas.ini)”, then “OK”.
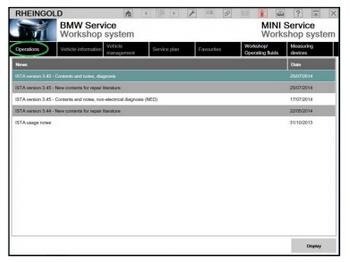
8. Go “Operations”, then “Read Out Vehicle Data” and “Complete Identification”

USING BMW RHEINGOLD ISTA WITH BMW ENET CABLE
1. Open used for connection network adapter properties, then “Internet Protocol Version 4 (TCP/IPv4)” properties, then enter 169.254.1.1 for “IP address” and 255.255.0.0 for “Subnetmask”.
2. If VMware is installed, open Virtual Network Editor and disconnect from the host any adapters with Subnet Address 169.254.0.0.
3. Connect car with ENET cable to PC, turn ignition on.
4. Now run BMW Rheingold ISTA using shortcut in start menu and wait until it boots, then press settings button.

5. Select “VCI Config” tab and “HO-ICOM/ENET local and ISIS network”, then “OK”.
6. Go “Operations”, then “Read Out Vehicle Data” and “Complete Identification”.
7. Select your ENET connection from the list and press “Set up connection”button.
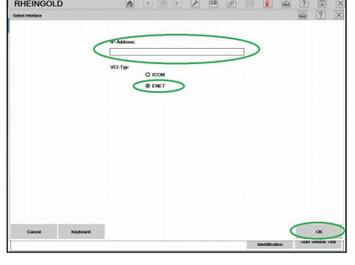
8. Alternatively you could select “HO-ICOM/ENET direct connection” in “VCI Config” tab and “ENET” mode with empty “IP-Address” field during connection setup.
DIAGNOSTICS WITH ISTA+
STARTING THE ISTA+ WORKSHOP SYSTEM
How to start the ISTA workshop system:
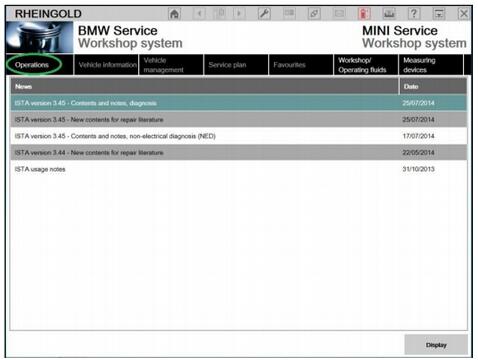
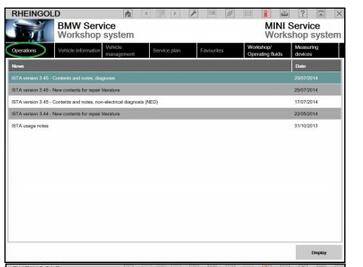
Double click the ISTA+ icon in the Windows desktop created during the installation process above. After ISTA is started, the start screen appears. A list of news is displayed. You can set the display period in the Administration.
setting-ista-1
Once you have read the “Note on using ISTA”, close the dialog using the button “Next”. You can open a process from the start screen: Select the “Operations” menu.
SELECTING A VEHICLE WITHOUT CABLE CONNECTED TO CAR
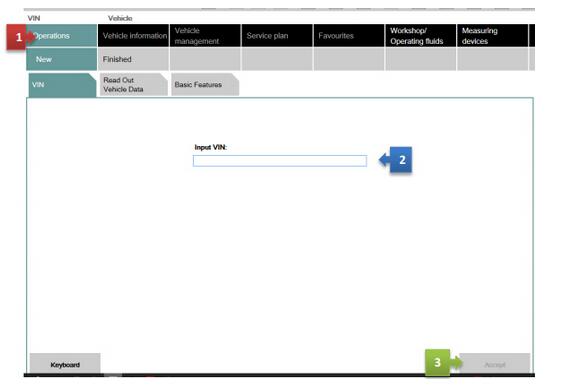
Method 1:
You can enter your short VIN (Last 7 of the VIN) and be able to pull relevant procedures or troubleshooting instructions without actually connecting to the car. To access this feature, launch ISTA+ and click on Operations tab (1). Then enter the short VIN into the VIN box (2). Then click on Accept (3). The Accept button will become active only when a VIN number is entered. You can explore features specific to your car from here.
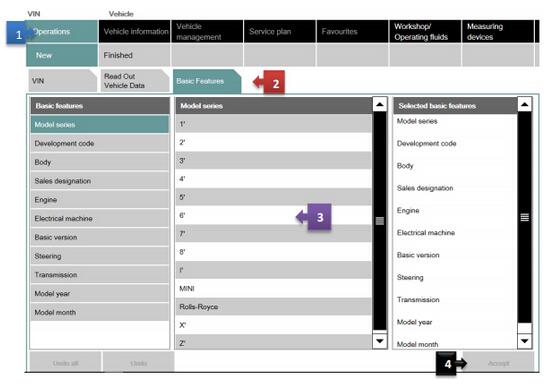
Method 2:
Follow the steps as in the picture below:
SELECTING A VEHICLE VIA “READ OUT VEHICLE DATA” WITH CABLE CONNECTED TO CAR
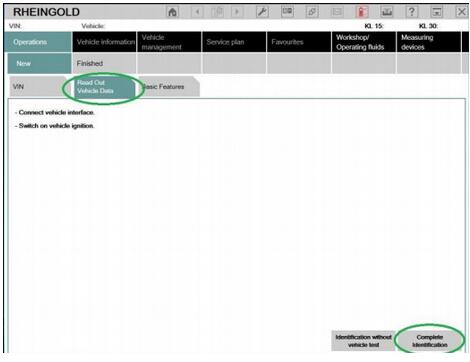
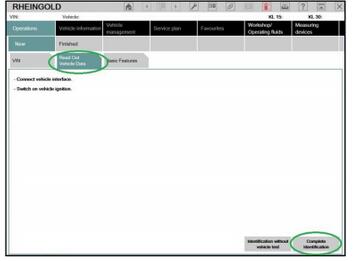
After you select the “Operations” menu from the start screen, the workshop system changes to the “Vehicle identification number” tab under the “New” menu item.
We will assume that you have connected the right interface to the car at this time (Refer to interfaces section). Our example will use BMW ICOM A2.
This is how to identify a vehicle by reading out the vehicle data, while automatically creating a process:
* Click the “Operations” main menu item in the navigation area.
* Select the “Read out vehicle data” tab and follow the instructions provided.
* Click the “Identification without vehicle test” or “Complete identification”button
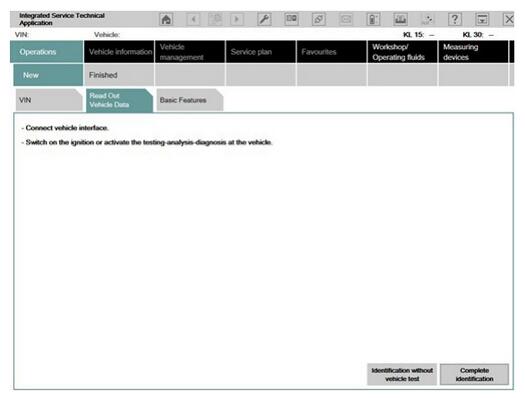
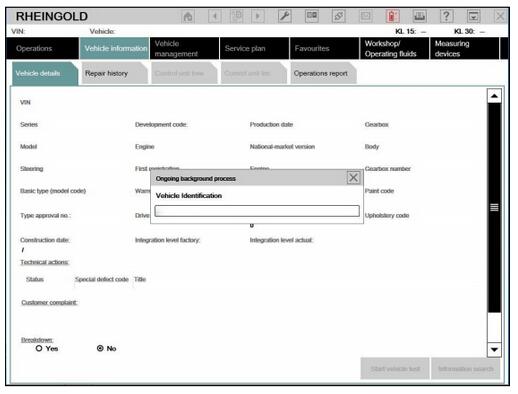
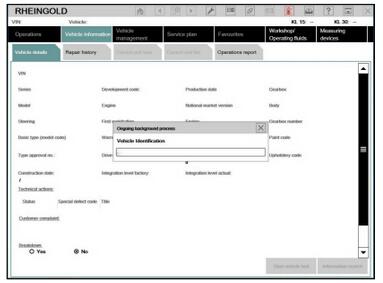
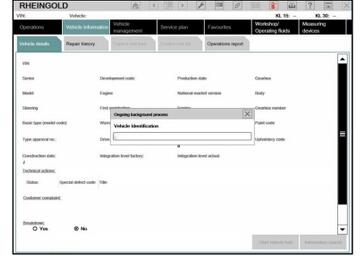
The connection to the vehicle is now established. The workshop system performs an identification of the vehicle. It also reads the vehicle identification number and further data from the vehicle. The progress of the identification operation is displayed on a progress bar.

Start vehicle test
If vehicle identification was called up via “Read out vehicle data” and “Complete identification”, the vehicle test starts automatically following vehicle identification, followed by the vehicle operation and service data transfer and analysis. The control unit tree is displayed during the vehicle test
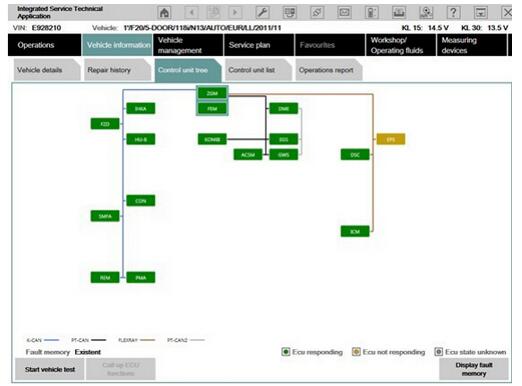
Here you can observe the ongoing determination of the control units that are fitted. If no control unit tree is available, the “Control unit list” mask is displayed automatically.
The control unit tree contains all the control units identified in the vehicle and displays their allocation to the relevant bus system. The control units are identified in succession and their fault memories are read out. The color then changes to display of the detected state. An explanation of the colors can be found in the lower section of the displayed mask. From this screen, if required you can restart the vehicle test or also call up control unit functions so that you can read out measurements or activate actuating elements.
Before you can access a test plan you must first display the fault memory. This is how to view the fault memory:
* Wait until the vehicle test is completed.
* Click the “Display fault memory” button.
Show fault memory
After the vehicle test, click the “Display fault memory” button in the “Fault memory” mask. The fault codes that are read out and the associated description are listed here.
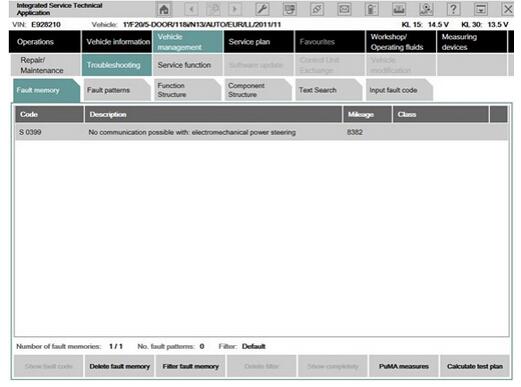
The function “Delete fault memory” can be carried out at the end of the guided troubleshooting. In order to start the guided troubleshooting, first calculate a test plan.
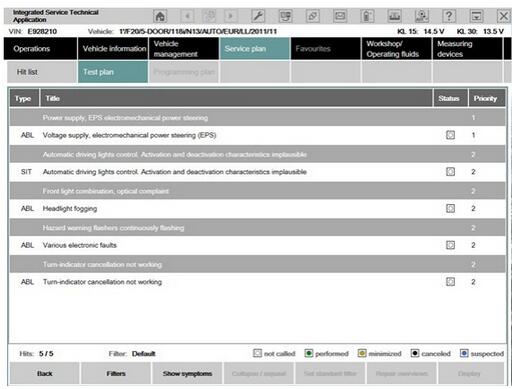
This is how to calculate a test plan:
* Click the “Calculate test plan” button.
Processing the test plan
The test plan lists the components and functions that might have caused the fault. The documents and test modules corresponding to the components and functions are displayed in the “Type” column, identified with “ABL”. In the “Type” column, documents and test modules are identified with an abbreviation.
Procedures localize a fault and give advice on rectifying it. This is how you start a procedure:
* Select the required procedure from the test plan.
* Click the “Display” button.
The priority in the test plan does not necessarily specify the call-up of the processes. The priority is to be regarded as a recommendation for processing.
A test module is primarily designed to identify the cause of a fault. Furthermore, service functions can be performed via procedures. Information can be displayed within a test module, as well as measured values read out or entered. Furthermore, queries can be made available in procedures via selection screens.
After a test module has been carried out, additional information is added to the test plan if this is necessary for further troubleshooting or fault elimination.
After the test plan has been completed, you should carry out the “Delete fault memory” function.
PROGRAMMING WITH ISTA+
Until now, different systems for vehicle diagnosis (ICOM ISTA) and programming (ISTA/P) have been used. This means it was necessary to change systems several times when repairing a vehicle using software.
ISTA+ has been expanded so that all the required programming functions for the series F, G and I are integrated.
E-series vehicles still have to be programmed using ISTA/P!
The functions relevant for programming can be accessed via the following menus:

Vehicle treatment
* Software update
o Comfort – as per the suggested measures plan
o Advanced – with broadened scope
o Additional software (range of functions is not active yet)
* Control unit replacement
o Before exchange (preparation) – control unit read-out for the exchange
o After exchange (subsequent evaluation) – control unit configuration after exchange
* Vehicle modification
o Retrofit
o Conversion o Conversion (only coding)
o Back fitting
o Immediate measures
