When the VCI device is properly connected to the vehicle, and paired to the
Autel Maxisys Pro Display Tablet, the platform is ready to start vehicle diagnosis. Tap on
the Diagnostics application button on the MaxiSys Job Menu, the screen then
opens the Vehicle Menu
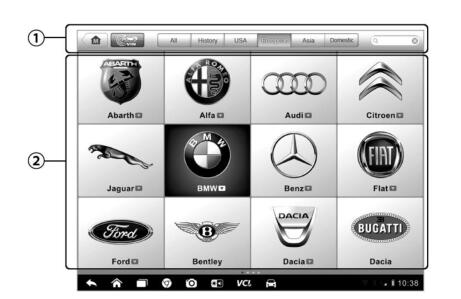
1. Top Toolbar Buttons
2. Manufacturer Buttons
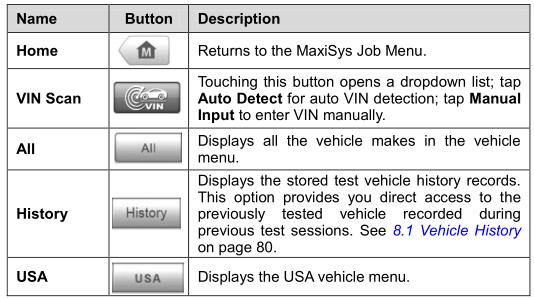
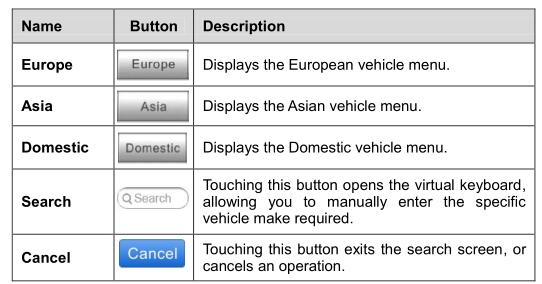
Top toolbar Buttons
The operations of the Toolbar buttons at the top of the screen are listed and
described in the table below:
Manufacturer Buttons
The Manufacturer buttons display the various vehicle logos and the brand
names. Select the required manufacturer button after the VCI device is
properly connected to the test vehicle to start a diagnostic session.
The small envelop icon displays beside the vehicle brand name is tappable,
touching which displays an attached PDF file, showing relevant information,
such as vehicle coverage and function list etc for the corresponding vehicle
make.
Vehicle Identification
The Maxisys diagnostic system supports four methods for Vehicle
Identification.
1. Auto VIN Scan
2. Manual VIN Input
3. Manual Vehicle Selection
4. OBD Direct Entry
1 Auto VIN Scan
The MaxiSys diagnostic system features the latest VIN-based Auto VIN Scan
function to identify CAN vehicles in just one touch, which allows the technician
to quickly detect vehicles, scan all the diagnosable ECUs on every vehicle and
run diagnostics on the selected system.
To perform Auto VIN Scan
1. Tap the Diagnostics application button from the MaxiSys Job Menu.
The Vehicle Menu displays. (Figure 4-2)
2. Tap the VIN Scan button on the top toolbar.
3. Select Auto Detect. The tester starts VIN scanning on the vehicle’s
ECU. Once the test vehicle is successfully identified, the system will
guide you to the Vehicle Diagnostics screen directly.
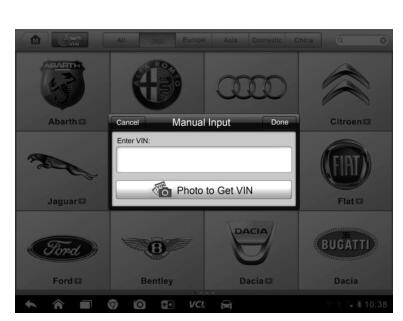
Manual VIN Input
For some vehicles that do not support the Auto VIN Scan function, the
MaxiSys diagnostic system allows you to enter the vehicle VIN manually, or
simply take a photo of the VIN sticker for quick vehicle identification.
To perform Manual VIN Input
1. Tap the Diagnostics application button from the MaxiSys Job Menu.
The Vehicle Menu displays.
2. Tap the VIN Scan button on the top toolbar.
3. Select Manual Input.
5. Tap Done. The vehicle will be identified in a few seconds, and once
the matching is successful, the system will guide you to the Vehicle
Diagnostics screen directly.
Manual Vehicle Selection
When the vehicle’s VIN is not automatically retrievable through the vehicle’s
ECU, or the specific VIN is unknown, you can choose to select the vehicle
manually.
There are generally three ways to enter the vehicle information:
A. Step-by-step Vehicle Selection
This mode of vehicle selection is menu driven; you simply follow the screen
prompts and make a series of choices. Each selection you make advances
you to the next screen. A Back button at the lower right corner of the screen
returns you to the previous screen. Exact procedures may vary somewhat by
various vehicles being serviced.
Manual Vehicle Entry
This Autel Scanner allows you to manually enter and save specific vehicle information,
such as PCM Part Number, Vehicle Calibration Number, or Tear Tag. This
function enables direct access to the vehicle’s ECM and saves your time of
doing step-by-step entry selections.
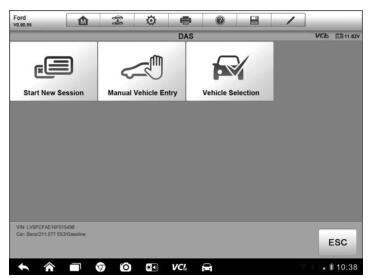
To perform Manual Vehicle Entry – take Ford for example
1. Tap the Diagnostics application button from the MaxiSys Job Menu.
The Vehicle Menu displays. (Figure 4-2)
2. Tap the USA or the All button on the top toolbar.
3. Select the Ford button from the vehicle menu.
4. Select Manual Vehicle Entry from the Vehicle Selection Menu. A series of information screen displays, tap Yes tocontinue.
5. Tap Cancel to exit Manual Input.
6. Tap the input box and enter the correct VIN.
27-6
7. Select one of the three entries in the option screen – PCM Part
Number, Calibration Number or Tear Tag.
8. Take the PCM Part Number entry for example; you need to fill up
the accurate vehicle information in the input boxes.
7. Tap OK to continue when the input is done. A confirming screen
showing the Vehicle Information displays.
8. Check if the vehicle information is correct, and then from the
confirming screen, select:
a) Yes to continue.
b) No to return to the vehicle selection menu.
Auto Vehicle Entry
Some vehicles provide an auto scan feature, which allows you to skip the
step-by-step vehicle identification procedure and retrieve the specific vehicle
information from the vehicle’s ECU directly.
? To perform Auto Vehicle Entry – take Ford for example
1. Tap the Diagnostics application button from the MaxiSys Job
Menu. The Vehicle Menu displays. (Figure 4-2)
2. Tap the USA or the All button on the top toolbar.
3. Select the Ford button from the vehicle menu.
4. Select Start New Session from the vehicle selection menu. A
confirming screen showing the Vehicle Information displays.
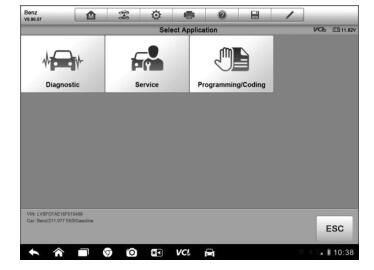
Diagnostics Operations Navigation
5. Check if the vehicle information is correct, and then from the
confirming screen, select:
a) Yes to continue.
b) No to return to the vehicle selection menu.
6. Select Yes and the Vehicle Diagnostics screen displays.
Alternative Vehicle Identification
Occasionally, you may identify a test vehicle that the tester does not recognize;
the database does not support, or has some unique characteristics that
prevent it from communicating with the tester through the normal channels. In
these instances, you are provided with the OBD direct entry, through which
you can perform generic OBD II or EOBD tests. See 4.9 Generic OBD II
Operations on page 57 for additional information.
9. Select Yes and the vehicle diagnostics screen displays.