In this post, I want to share a successful experience from a customer. He updated his Opel/Vauxhall CD30/CD30 MP3 to CDC40 with the Tech 2 Scanner which bought from obd2tool. The following is his guide and help Opel owners to have advanced Audio display.
Tools you will need:
GM Tech2 Diagnostic Tool Opel 32MB card or OP-COM CAN OBD diagnostic interface
Blaupunkt car CDC40
How to:
Turn on the dashboard
Connect Car Diagnostic Tool Tech2 scanner to Opel/ Vauxhall OBD port by using the OBD2 cable
Turn ignition ON
Disable below anti-theft protection modules with Tech2 scanner by following steps
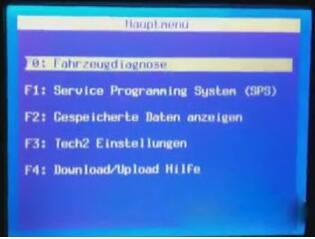
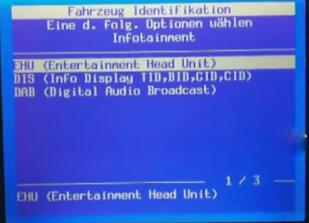
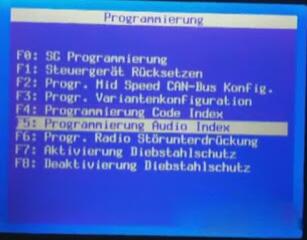
EHU -> Code Index -> 001_02
Enable the anti-theft protection:
GID / CID
UHP
EHU
Turn off the dash and disconnect Tech2 scanner
Remove the CD30 / CD30 mp3 using the appropriate accessories. You will need to disconnect the antenna wire and the connector big loosening the locking device that engages in the lower part of the connector
Replace the original antenna with the appropriate terminal for receiving digital signals:
Unscrew the existing antenna
Disconnect the sky (just ask for details)
Unscrew the nut holding the antenna base
To avoid replacing the entire cable I suggest you remove it from the antenna and then connect the old to the new
Connect to your CDC40 connecting the connector and the antenna wire.
Enter the CDC40 in his quarters, making sure that the connector wire remains free.
Turn the ignition on.
The CDC40 will turn on and begin to “bip”, the display will alternate “Display SAFE”, “Radio SAFE” and “UHP SAFE”.
Program with the Tech2 scan tool EHU and set all the values to “Not Present”
GID Present
UHP Present
ECC Present
DAB Present
EHU Present
Program with the Tech2:
EHU -> Code Index -> 001_02
Enable the protection (anti-theft) of:
GID / CID
UHP
EHU
The radio will reboot and the screen will show “head unit protection”.
Press and hold the Eject button on the CD until you hear a ratcheting noise. This step serves to unlock the transport lock.
Done.